|
You finally reach the lower part of
Dorn's Deep - Lower Dorn's.
Now you will see lots of
Deep
Gnomes,
Drow,
Salamanders, and all kinds of
Elementals. This chapter
is the toughest of them all, after all, its the last
chapter. Saver this Chapter! :-)
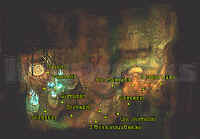
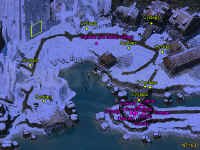
You will start off on the walkway, now you can do
these maps in any order you wish, so you don't have to
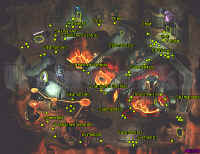
follow these directions exactly. Below is the Full map
of the Lower Dorn's Map. This map is where all the
areas split off into other maps (A few large) and
mostly tough, with LOTS of great magical items! (See
some of the maps for locations of the BEST items).
There's a +7 Item in this chapter! Amazing...

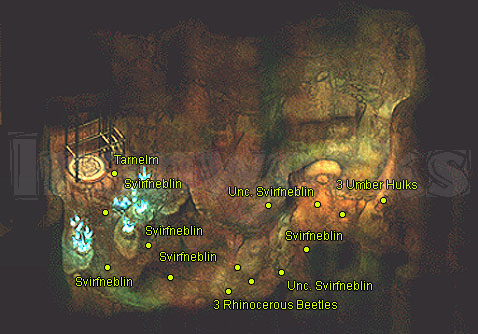
I started off going to talk to the
Deep Gnomes
in the
Diamond Mines, take the Floor elevator to the bottom
(Its in the north west part of the map).
Talk to
Tarnelm, the Deep Gnome. He'll be
the grumpy
gnome.. He and his people are starving, and need food.
He will ask you if you can kill all the Fire
Salamanders and get them some food. after you spoke
with him, walk to the east and kill the monsters
there, then go back up.
From the Main Lower Dorn's map, head over the lava,
and directly to the door. You'll be asked by Seth for
some Papers that will get you into the area, you can
bluff, but all paths lead to a fight with a few
thieves come out of the shadows - Be warned, if they
succeed at backstabs, you better have some healing
potions ready. These guys are kinda tough in small
packs.
After you have killed all those decloaking thieves,
lol, go into the door and you'll enter Marketh's
Garden.
First thing you will need to do here is quaff some
potions of magic resistance. The Mushroom heads (Red
Mycontids) are back, and they can charm you or stun
you with their magical spores. the potions will help..
Kill these, and there are A LOT of them, so use lots
of fireballs, lightning etc..
As you make your way to the center of Marketh's
Garden, you'll hear a horrid sound-
Shriekers! these
plant-type things are kinda like an alarm, and as long
as they are making noise, more and more monsters will
arrive, and attack you. What you need to do is hack
them all up; kill them all, and finish off the rest of
the summoned Boneguard monsters.
Now talk to Callard and his son in the center.
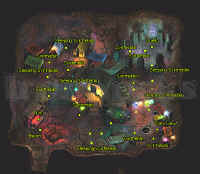
finally, you have a choice of ways to go now, none
really need to be done in order, so its up to you.
The huge garden has four doors. to the North, a
hallway leads to the Ilmater temple. East, to the
Mines. West to Malavons temple and the last, Northwest
leads to Marketh's temple - ALL house lots of tough
battles, so save the game often now...
We chose to go get Marketh's badge first,
enter the door and you'll enter a large 1st floor. This
level is where you can get some nice magical items, and a
bag of potatoes for the deep gnomes.
First off, hit the first room, you'll meet
Fleezum.
you can attempt to bluff him, but chose NOT to, because if
you do, and he lives, he'll be upstairs along with a bunch
of thieves waiting for you. He's got the "Bathed in
Blood Armor", which is really cool.
After you do that, go to the next room, the Kitchen, and
kill the cook, he is evil, and will warn all the people
upstairs if you let him go.
Get the
bag of Potatoes and head south, enter the purplish
room, where Marketh's Drow sister
Ginafae
resides. she explains that he abuses her. if you tell her
that you plan to kill her brother, she will plead for his
life, but won't attack you. do what you will, and go to
the last room on this level; Fleezum's brother, Flozem.
He'll attack you outright, so dispatch his ass and take
the stairs up!
As you come up, you'll see a few Thieves come out of
the shadows (decloaking captain! lol!) anyway, take
care of them, and be ready for more every few paces.
After that, go in the first room to the North, this is
where
Seth
is. He'll plead for his life, but kill him,
and take his stuff. (Remember to check the maps above
for a listing of the magical items, and where they
are).
Leave his room, and you'll encounter more thieves,
take them out and go into the next room to the North -
Here is where
Marketh
is! You can either take his
badge
and kill him, or allow him to live. (Kill the
Women beater!).
Go back down the stairs, and head back to the Drow
female (If you let her live). if you spared her
brothers life, you'll get some experiance points... (I
killed him)
Leave
that area, and the garden and go back to the elevator
where you met the Deep Gnome that was needing food.
give him the sack of Potatoes and he'll now ask you to
kill some of those Umber Hulks, which is in the
northeast part of the area (they are hidden, but when
you enter the area, they will bust out of the walls).
When they DO,
kill them and enter one of those caves they came out
of..
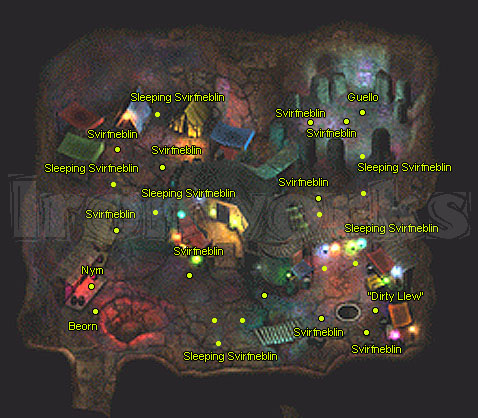
The Svirfneblin village is here, after you enter the
caves where you killed all those Umber Hulks, Beorn
will walk up and tell you that he needs your help. One
of the clans Priests has been taken to the Mines, and
wishes you to find him.
Near the Entrance there is a Dark Elf Merchant, Nym.
Now he'll speak in Drow first so tell him to speak
common tongue. This Drow has lots of great Items -
Many are magical, and have +'s to them.
If you decide to kill him, wait and buy some of his
stuff, and if you wish to complete the Arbatorium
quest in the Severed hand area, buy his
Cage
full of birds.
Nym is THE
one responsible for the Dwarves and Elves long war.
and was providing the magical items to both sides. (Remember,
Drow Elves can live 500 years).
If you want to kill him, be warned; he is
tough,
but if you do nearly kill him, he'll escape, and be in
the Northeast part of the same map, so go and finish
him off, and take your money back, and some items he
has.
To
get to the Mines area, go back to the Garden map
(Where the Shriekers were, and take the east path, and
you'll enter the Mining area.
Enter the cave, and you'll find a lot more slave
Svirfneblin, one of which is the Priest;
Guello.
You'll need to go kill off all the Fire Salamanders,
and the Leader of them
Shikata,
is towards to north. He'll say that they can't escape
while the Salamanders are watching them.
The entire area is full of Fire Salamanders, so make
sure you have lots of Resist Fire spells ready and any
items that protect you with resist fire. They hate
Cold spells, so give'em hell with
Ice
Storm, Cone
of Cold
and stuff..
After you've taken care of the Leader of the Fire
Salamanders, return to
Guello
and tell him its safe. He will thank you, and get all
the Svirfneblin out of there, and gaining experiance
points. Now, you can also return to the map where
Beorn
is and tell him that you rescued his fellow
Svirfneblin,
and receive even more experiance points!
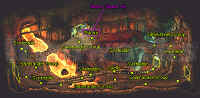
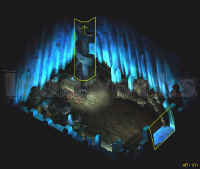
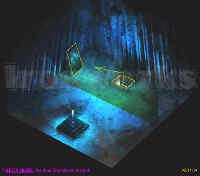
Now its on to the little evil boy Malavon...
To enter his Palace, you'll need to go through what
looks to be a deserted town, be warned, its not empty
- LOTS of Umber Hulks and Blind Minotaurs reside in
the area many hidden!
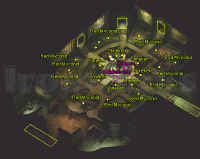
Check out the Map, there are a few traps in the area,
so have your thief detecting traps. ALSO, this map is
where the totally awesome sword Pale Justice is
located. its a +7 Sword!! Check the map for the exact
location!
After you've taken care of the monsters, and found
Pale Justice, head to the upper top north part of the
Map where the Green Dome is. Enter and be ready for
more fun!

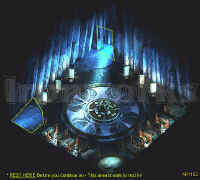
First thing: SAVE! Entering Mr. Malavons area, you see
lots of freaky stuff, Mushroom things being
genetically worked on, and other weird stuff. There
are many abused (And Blind)
Svirfneblin
in
this map, but none will attack you. Head over to the
East, and you'll meet Malavon, that sick bastard!
<g>
He'll ask you to drop all your weapons or he'll kill a
group of Svirfneblin that he has in front of him,
acting as a shield. Sadly, it doesn't matter what you
do here, he will kill the little guys, and then you,
so don't drop your weapons.
Some
Hints for this fight:
The
2 Iron Golems are extremely hard to kill. You'll need
a +3 weapon or better to hit them, and they're
100%
immune
to spells, so save those for Mr.
Malavon.
Send your toughest fighters after the Iron Golems, and
have your Mage and Cleric hit
Malavon
with all your spells, when the Golems are dead, have
everyone pour over Malavon and finish him off, but its
not over. That was a decoy of him, NOW comes the
'real' Malavon, which is slightly harder than the
decoy. Be careful to, he casts lots of deadly spells,
such as Finger of Death and Malavons Fury. After you
finish him off, Goodies are in store for you now,
Malavon
has lots of goodies in his room, and on his body (I
believe). You will receive
50,000XP
for killing him as well.
Get his
Badge,
and all his items, such as
Fire
Kiss Dagger +3,
a
Robe
of the Watcher,
and a
Robe
of Evil Archmagi
(Only evil characters can use this), pick up the
Seeds
on the Long Shelf.

As you approach the Guard tower, a little girl will
appear, talk to her and she'll give you a key to the
Guard tower. what you'll need to do is get to the
tower FAST, because the Archers in the Tower are
firing off Arrows of piercing +4 at you.
Once you're in, you see a group of Archers. Attack
them all and loot the Leader of the Archers- Kelly's
Dead body.
After you have taken his items, go in the Door to the
top floor room. It's safe to rest in this little room.
After you're done, its time to head over to the Forge,
this place has Elementals - Air, Fire and Water, plus,
to make things worse, you have Fire Giants - LOTS of
them!
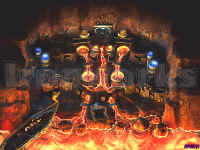
To get to the forge, go from the main Lower Dorn's
map, all the way south, take the mine entrance (on the
tracks) to the Forge There are other ways to enter,
(Like the area where you found the Gnome Priest. (Also,
Remember to save)
This Area (As I stated above) has lots of tough
monsters in it, such as
Fire
Giants
(About 12 of them),
Air,
Fire, Earth & Water Elementals.
As you enter the area, whichever you take, the Fire
Giant will approach you and ask you why you are there,
bluff if you want, and say that you're here to see
their Leader,
Maiden
Ilmadia.
To find her, walk on the lower path to the East and
her small hut is on the Shore, enter and it really
doesn't matter what you say here, it all ends in
battle. (See
Battle tips below)
Kill
Maiden
Ilmadia,
and take the Badge, and her Magical items.
Battle
Tips:
Start off by killing off all the Fire Giants, get one
of them over to the far west upper exit, and attack
it, then, once a bunch more come over, leave through
the exit and use
healing
spells
and such, or return to the safe rest areas, repeat
this until all
Fire
Giants
are dead. If you have yet to talk to the Maiden, and
attacked the Giants first, don't bother, she'll come
looking for you with the giants. Another way is to go
talk with the Maiden, then before you're trapped in
that area,
RUN
back to that area near the exit and do that repeat
thing.
Finally, kill off all the
Elementals.
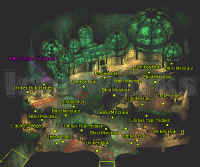
Loot all the stuff and now its time to hit the Temple!

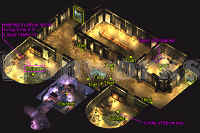
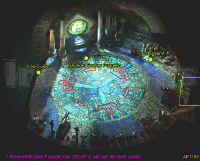
This area can be reached in two different ways , 1 of them trough 'Marketh's garden', by taking
the upper north entrance, and the other one by taking
the upper north entrance trough the 'Forge area' ,
This area is very hard, Featuring 4 'big' hordes of
Boneguard skeletons and a couple of greater mummy's
and zombie lords. Try to conquer this
area in 4 'pieces' , don't rush attack the greater
mummy's because you will get 50 Boneguard skeletons on
your back. Lure 1 horde of Boneguard skeletons (10-15
pieces) with your fighters at a time, then move on to
the next 'horde', etc..
'The idol' and his pack of Greater Mummy's &
Zombie
lords guard the 6 'key locks' to unlocking the
stairway which will lead to Poquelin, lure the Greater
Mummy's one by one away from the pack and kill them,
this way the battle with the idol will be much easier.
After you killed all the Greater mummy's , rush attack
the idol with your strongest fighters , he will be no
problem at all. Now insert the
5 badges
you've found
so far in the key locks , You'll notice that you don't
have the 6'th one , this can be solved by talking to
the priest located at the center of the map (near the
throne) , he will thank you for freeing him and will
give you his badge, Insert the last badge and you can
take the stairs up to confront Poquelin.

Take the stairs up and you will find yourself inside a
Church,
Poquelin
will approach you and tells u
about his history , it seems that he was banned from
his world because his little vendetta with
Yxunomei
got out of hand , Yxunomei followed shortly after and
begun building forces on your world , Until Poquelin
stumbled upon an ancient artifact , this artifact was
so powerful that monsters from the region left their
homes and searched him out, So forming a terrible
strong force.
After this Poquelin will Attack you, a
Red
Mycontid, Minotaur,
Boneguard skeleton, Frost Salamander and one Earth
Elemental will attack you as well, send your
strongest fighters towards Poquelin and keep the other
creatures occupied, Poquelin has
100% magic resistance
but can be hurt with magical weapons, After a while Poquelin
will teleports himself and your party away , leaving
the battle field behind.
|
Back
to Easthaven, Final Showdown! |
You will find yourself back in Easthaven, The whole town lays under big layers of
ice, and houses are destroyed. A big
Cyclops
will
attack you upon entering this area , slay him and move
southwards, You will see 2 Cyclops guarding a bridge
kill them as well and cross the bridge. All the
townspeople are being held inside this prisoner camp,
talk to Everard (Tempus priest) , and he will tell u
how to enter the crystal tower, you can talk to the
other townspeople as well, they will give several
items and some information, It seems that Pomab,
Old Jed and Jhonen escaped the madness and are missing
ever since.
Enter the Crystal Thirth,
Everard
will follow shortly
after. Now take the stairs up, you will find yourself
on a empty floor, This floor is the only place to rest
safely, Rest and prepare for a hard fight.
Now
remember, before you
enter the next area is reached, you will need to
SAVE
the game, and memorize some different spells this
time. (See Below)
Remember to cast 'Haste' on your party, 'Strength of one'
and have everybody except your strongest fighter's
invisible, This will require 4 or 5 memorized
'invisible/improved invisible' spells.

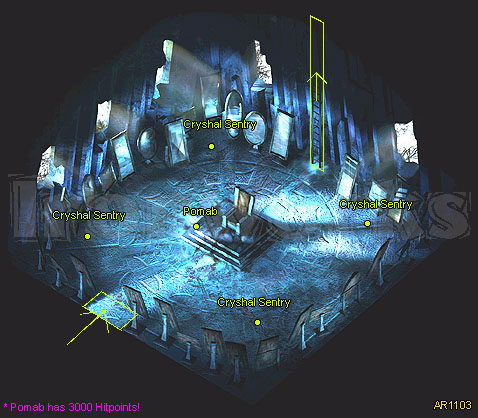
Now enter the next area, Pomab will approach you, it
seems that HE was evil from the beginning, it was HE
who told Hrothgar to start an expedition, it was HE
who lured everybody into their deaths, He and his 4
crystal sentry's will attack you, IF you made the
preparations shown above do the following; Put your
invisible party members near the throne and keep them
there, Now let your fighters attack Pomab , they will
attack his 'mirror images' first , slay ALL the mirror
images until 1 Pomab remains, slay this last Pomab and
the 4 crystal sentry's will fall to the ground. (The
invisible party members are supposed to do nothing,
The hasted fighters should be fast and strong enough
to finish the mirror images off, and to kill the real Pomab
as well, The crystal sentry's will chase your fighters
, but concentrate on Pomab's mirror images because the
sentry's will die when Pomab dies), You can of course
choose another method of dealing with this fight, that's
totally up to you. When you killed Pomab return to the
area you came from, take a good rest and prepare for
the final battle.
Enter Pomab's room again and take the ladder up to the
next one,
Enter the Mirror and you'll see another in-game
sequence where Everard sacrifices
himself for the greater good, Poquelin transforms into
Belhifet, a Major Demon from the Lower planes.
Some
Battle Tips:
Use Resist Fire for sure, this is key to winning this battle, cast
the spell on your best melee fighters. Also, use
Haste! This is another major key of winning the battle, cast it
on your party, and the will attack twice as fast!
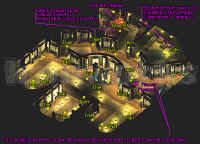
Have your Thief get rid of the traps (See the Red
outlines on our map). These traps will dispel your
stuff and spells if you hit one!
The 2 iron golems will attack you also, you can use
one of your mages as a decoy here, OR kill them with
your hasted fighters
Remember, Belhifet and the two Iron Golems have 100% magic
resistance and can only be hurt with magical weapons
with at least +3 to their attack damage. Use the 'Arrows of piercing +4' , which you got from
the archers inside the watch tower
on Belhifet it will hurt him BAD. Remember to heal party members which suffered damage,
Belhifet will inflict superb damage to your best equipped
Warrior.
After you've finally killed the sucker, its time
to check out the end cinematic. Its kinda cheap IMO,
the cut scenes could have been much better..
|