|

Chapter One
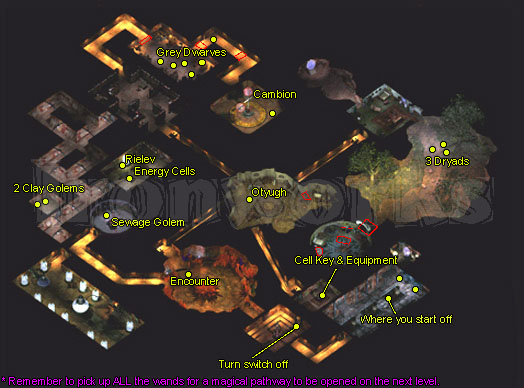
Irenicus Dungeon Level 1
You wake
up to Imoen releasing
you from your cage- You've been captured, and mentally tortured
as you can slightly recall..
After you get out of your cage, go and talk to Minsc,
the way to get him out is to make him mad. Tell him you're
leaving him in the cage, and he'll get mad and bend the
bars, then he'll say that you knew he'd do that, and tell
you "You're a Smart one"!
After that, go to the small room that is off of to the
Southwest, this is where you will find a key that allows Jaheira
to be freed. lots of your equipment is also on the table
and chest. Get it all, and rest. (It's save)
After you rest, and have had Imoen
and Jaheira memorize
some spells (Important) its time to find a way out.
Remember that Imoen is a thief, and you'll need to have her
pick some locks, and detect traps, because there are a few
in this map area.
You'll see a few dead bodies in the hallway, follow it to a
room with a huge alter in the middle- its creating
Lightning Mephits, so you'll need to switch this thing OFF
(See Map for switch location)
Continuing on,
you'll enter another room, this is where you will meet up with a Genie
named Aataqah who will ask
you a riddle, the two answers you can give are either
"Push the button" or "Don't push the
button". Either way you will have to fight something
afterward. If you answer "push the button" an
Ogre Mage will spawn who is worth some good exp so choose
that one. The other answer will just spawn some worthless
Gibberlings.
Next, go
to the next room down the hallway, where a Sewage
Golem resides. tell him that you're his master,
and he'll tell you that you need the activation stone to
'control' him, allowing him to open the doors to the
central room. next, you'll see a room with two clay golems,
you need to take these guys out, because later on, when you
enter a private room (Near the Dryads greenery area, an
alarm will sound, and they will come running to attack you,
so kill'em now!
Next, enter the room to the North, and you'll see a tank,
where a creature/thing named Rielev.
He is a product of Irenicus' evil
spell effects. Talk with him. He'll ask you to kill him,
because he's suffering - do it. Take the
Energy
cell
and the Activation
stone
that is on the table, among other items.
Go back to the Sewage Golem and use the Activation Stone, and
have him open up the four doors to the central room. -
you'll get 3000XP for this. You
can also use the Energy Cell to activate 4 of the Water
tubes and speak to those creepy things. You don't have to,
but they give you some idea of what this freak
Irenicus
is!
Next stop is the Library (See map), you'll encounter some
gray
Dwarves
here, go directly for the magical user, and the battle will
be won. Remember to pick up the
Acorns
here, then proceed to the next room where a guy named
Cambion
here, trapped in a magical sphere. use the machine in the
middle of the room to turn the sphere off, and kill him for
6,000XP!
Now that you've cleared out the outer dungeon, its time to
enter the central room, where an
Otyugh
is awaiting you. These things are pretty easy to handle,
send everyone up for the kill. Be warned, there are traps
on a few chests here, have Imoen check for traps first
before you go looting! <g>
Now head down the tight hallway and you'll enter an odd
wilderness type room, where
3
Dryads
are. They will tell you about the evil dude, and his name.
They ask you to find some
acorns
so they can escape, You should have them already, so tell
them you have them and you'll get 9,500XP for that! After
you've talked to them, talk to them again, and ask for the
Gene Flask. (After visiting the Genie. see below)
To the south is a room that is full of traps, again, have
Imoen clear the way and loot this room. (If you didn't kill
those 2 Clay golems, then they will be arriving in a minute
to attack you since the alarm went off). In this room,
you'll find an Air
Elemental Statue
and more goodies. In the Master bedroom, you'll find the
Portal
key
- this will allow you to use the Stargate.. um, er.. I mean
Portal!
Using the Air Elemental Statue, enter the the door that was
locked by the Library. You'll be in an odd place, where you
will end up talking to a Genie. He requires his Genie
Flask, so that he may be freed. (the 3 Dryads have it).
Once you return, and give it to him, he will give you
Sarevok's Sword of Chaos +2! and you'll gain a whopping
15,000XP for completing this quest.
Now that this Dungeon is cleared out, its time to head into
the Portal (Stargate I say!), and on to the 2nd level!

Irenicus Dungeon Level
2
NPCs in this Map:
Yoshimo (Human/Male - Bounty Hunter)
On the
second level, allow Yoshimo to join your Party- He's a
good thief/Bounty Hunter!
Search the crates and head Northeast into a room. As told
by Yoshimo, kill the four Elemental
Portals to stop the Mephits
coming through 5,000XP each. You'll now be treated to some
dialogue as Jaheira finds Khalid's
desecrated body, and you get to listen to her while a
bit.. ugh!
Head through the two doors towards the west. A battle
between a Clone and an
Assassin will take
place, with the clone winning then attacking you. Kill her
for experience points. Through the East door, go across
the bridge (Warning, there is a trap here, have Imoen
Disarm it) and kill the Duergars.
With the
Keys/Wands, "activate" each of the pillars along
the western edge to get the wands. All the wands have one
charge left. Loot the statue. Through the Western door
you'll fight a Vampire
and Shadow Thieves -
not too tough and probably worth it.
In the
Northeast there are two corridors. The North passage leads
through a goblin-guarded Forge to a room containing four Duergars,
minor treasures and the Girdle of
Bluntness.
The lower
one leads into a room with a division. On the other side
of the division is Frennedan
who asks for rescue. Check the chests for minor treasures
and the key. Release
him and he'll follow you.
Go down the Southeastern
corridor from the 'Wand' Hallway. You'll come into an area
where three Shadow Thieves challenge you. Kill them. At
this point, Frennedan turns into a Greater
Doppelganger, so kill him and get 3,000XP!
Follow the
passage down and over the bridge. Simply continue along
and leave Irenicus'
Dungeon.
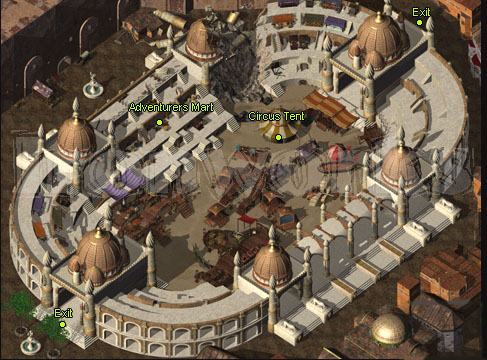
Waukeen's Promenade
(Following is a Cut-Scene)
As you exit, you'll see Irenicus killing off lots of
Thieves out in the open, then you'll fight Irenicus!
Some Cowled Wizards will Appear and arrest Irenicus and
Imoen for illegal use of magic. You'll have to get her
back, but first things first, explore the area!
NPCs
in this Map:
AERIE (Elf Female Cleric/Mage)
The only major thing here besides the Adventurers
Mart is the circus tent. Talk to the guard
outside and say you'll try to end the evil inside. Inside,
answer the genie on the bridge's riddle as 3
19,500XP. Enter the tent. Talk to Aerie
and agree to help her free herself.
Head West
and talk to the Spider- don't attack it, the Spider is
really an illusion of a Elf. Go over and kill the peasants
(Monsters that look like Humans). One of them has the
sword that will free Aerie.
Give it to Aerie
18,500XP and let her join.
Before you
enter the next area, REST.
and memorize spells that Aerie has, then go through the
door guarded by the pleasure slave. Inside, kill all the
monsters and enter the door at the top of the staircase
(the genie will
reappear and give some information).
Inside this
circular room, Kalah
will try to kill you, but first he tries to kill Quayle
while some monsters kill you. Use part members to disrupt
Kalah's spellcasting, and deal with the monsters. Keeping Quayle
alive & Killing Kalah
will earn you 2,000XP!
Everything
will be back to normal, and Aerie will stay with the
group. Take Kalah's
treasure and leave. Outside, talk to the guard again for a
Reputation increase of +1.
Otherwise,
the only obvious thing to do here is shop. There are some
distractions though:
On the top
floor of the Den of Seven Vales,
there is a group of adventurers. Be a smart-ass to them
and they'll attack you. A tough battle (the
Dwarf has 200 HP!), but worth it!
Search the bodies and chests for some of the magic items
from Baldurs Gate 1!
Chapter One Concludes, and you're off to the Slums!
|